Contact & Community
📍 Metro Manila, Philippines
🌐 robimotoph.com
✉️ hello@robimotoph.com
📱 +63 917 517 0594
📍 Metro Manila, Philippines
🌐 robimotoph.com
✉️ hello@robimotoph.com
📱 +63 917 517 0594
Struggling with muffled audio, wind noise, or inconsistent voice levels while riding? This guide helps you fix motorcycle helmet audio using real-world techniques that work in Philippine conditions. Learn proper mic placement, wind protection, gain control, and setup adjustments to improve clarity without expensive upgrades. Whether you ride in heavy traffic, highways, or unpredictable weather, this article breaks down the exact steps to get clean, usable motovlog audio. Designed for both beginners and experienced riders, this guide focuses on practical fixes that actually work on the road.
A muffled or unclear recording usually happens when your microphone setup does not match the riding environment. To fix motorcycle helmet audio, you need to address placement, airflow, and gain settings. These three factors control how your voice is captured and how much noise enters the system.
Most riders assume the microphone is the problem. In reality, the issue is often how the mic is positioned inside the helmet.
When the microphone is placed too far from your mouth, your voice loses clarity, while background noise becomes more dominant.
Inside a helmet, even a few centimeters matter.
In many real-world setups, riders place the mic near the cheek pad without checking alignment. As a result, this leads to uneven audio, especially when turning your head.
Helmet padding is designed for comfort, not audio. When the microphone is buried under thick foam, it blocks high-frequency details from your voice.
The result:
This becomes more noticeable at higher speeds, where external noise already competes with your voice.
In Philippine conditions, where helmets are often tight due to heat and sweat, padding compression changes over time. This can shift your mic position without you noticing.
Gain controls how sensitive your microphone is. If it is set too low, your voice sounds weak. If too high, it captures everything, including wind and engine noise.
Common issues:
Many beginner setups rely on auto gain. This works in controlled environments, but fails on the road where noise constantly changes.
| Problem | Likely Cause | Impact on Audio | Fix Priority |
|---|---|---|---|
| Muffled voice | Padding interference | Low clarity | High |
| Wind overpowering | Poor placement | Voice loss | High |
| Volume inconsistent | Auto gain | Unstable audio | High |
| Distortion/clipping | Gain too high | Harsh sound | Medium |
Most audio problems are not hardware limitations. There are setup issues. As a result, riders who adjust placement and gain properly often get better results than those upgrading to more expensive microphones.
If you want a full breakdown of how systems work and how to build a complete setup, you can explore the motorcycle wireless microphone guide for Filipino vloggers, where the entire audio ecosystem is explained step by step.
Wind noise occurs when fast-moving air directly hits the microphone and overwhelms your voice. Therefore, to fix motorcycle helmet audio affected by wind, you need to control airflow before it reaches the mic using proper placement, wind protection, and riding-aware adjustments.
At speeds above 40–60 kph, wind becomes the dominant sound source. Without control, even a good microphone will sound unusable.
A deadcat, or furry windscreen, reduces wind impact by diffusing airflow before it hits the microphone.
In real riding:
Most wireless transmitters now include small wind muffs. However, their effectiveness depends on how securely they are attached.
Loose or misaligned wind protection reduces effectiveness significantly.
Not all areas inside the helmet experience the same airflow. Some zones are more exposed, especially near vents or gaps.
Best practice:
Small adjustments, even 1–2 cm, can reduce wind noise noticeably.
In Philippine riding, open-face helmets or slightly lifted visors increase airflow, making placement even more critical.
Wind behavior changes depending on speed and riding environment.
Your setup should handle all three, not just one condition.
Scenario A:
Scenario B:
👉 The difference is not the mic. It is airflow control.
| Factor | Without Fix | With Fix | Difficulty |
|---|---|---|---|
| Wind protection | Harsh noise | Controlled airflow | Low |
| Mic placement | Direct wind hit | Reduced exposure | Medium |
| Speed adaptation | Unpredictable audio | Stable output | Medium |
Wind noise is not eliminated. It is managed. Riders who control airflow at the source produce more consistent audio than those relying on post-processing fixes.
Proper mic placement is the most effective way to fix motorcycle helmet audio. The goal is to capture your voice clearly while minimizing airflow, vibration, and contact noise. Even a high-quality microphone will sound poor if it is positioned incorrectly inside the helmet.
Small adjustments in placement often create bigger improvements than changing gear.
The two most common placements are the chin area and the cheek area. Each behaves differently depending on airflow and helmet design.
Most riders get better results starting near the cheek, then adjusting closer to the mouth.
Distance controls how dominant your voice is compared to background noise.
General guide:
In real riding, distance also shifts slightly due to helmet movement. That is why secure mounting matters.
Contact noise happens when the mic rubs against padding, straps, or your face.
Common causes:
Fixes:
Even minor friction can produce low-frequency rumble that becomes noticeable during playback.
Scenario A:
Scenario B:
👉 The improvement comes from positioning, not equipment.
| Placement Factor | Poor Setup | Optimized Setup | Impact Level |
|---|---|---|---|
| Distance | Too far | 2–4 cm from mouth | High |
| Position | Direct airflow | Slightly off-center | High |
| Contact | Touching padding | Secured and isolated | Medium |
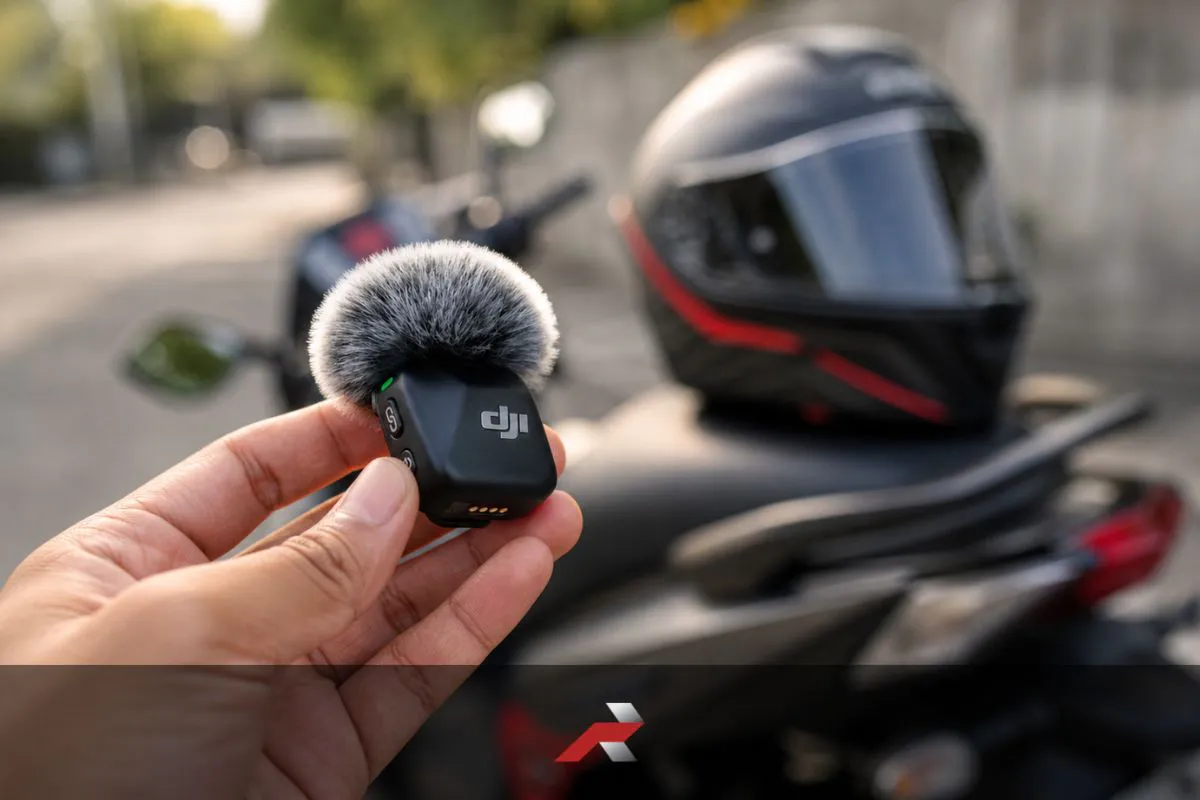
For understanding how compact wireless systems are designed for placement flexibility, you can refer to the DJI Mic Mini official product page, which shows how transmitters are built for discreet positioning and stable audio capture.
Placement is the foundation of audio quality. Riders who spend time dialing in mic position consistently achieve better results than those upgrading equipment without adjusting setup.
Inconsistent audio levels happen when your microphone cannot handle changing noise conditions while riding. To fix motorcycle helmet audio with unstable volume, you need to control gain settings, avoid clipping, and maintain consistent voice projection. These three factors stabilize your audio across different riding scenarios.
On the road, your environment constantly changes. Without control, your audio will fluctuate between too quiet and too loud.
Gain determines how sensitive your microphone is to sound.
In Philippine riding conditions, auto gain tends to boost background noise at stoplights, then drop your voice at speed. This leads to inconsistent recordings.
Manual gain provides more stable results once properly set.
Clipping happens when your audio signal becomes too loud and distorts.
Common signs:
To prevent clipping:
Additionally, motorcycles introduce unexpected bursts of sound, especially during acceleration or overtaking. Your setup must handle those moments.
Your voice also plays a role in consistency.
Better results come from:
Inside a helmet, sound reflects differently. Controlled speech improves clarity more than simply increasing volume.
Scenario A:
Scenario B:
👉 Stability comes from control, not automation.
| Factor | Poor Setup | Optimized Setup | Priority |
|---|---|---|---|
| Gain mode | Auto | Manual | High |
| Gain level | Too high | Slightly conservative | High |
| Voice delivery | Inconsistent | Controlled and steady | Medium |
Consistent audio is built before recording, not fixed after. Riders who control gain and voice delivery reduce editing time and produce more usable footage.
If you want to see how these adjustments work in actual rides, you can explore the real-world DJI Mic Mini experience for motorcycle vlogging, where setup changes are tested across different riding conditions.
A real-world setup to fix motorcycle helmet audio focuses on consistency across traffic, speed changes, and weather. For Filipino riders, the goal is not perfect audio but a stable, usable voice recording during daily commutes and unpredictable road conditions.
This section integrates all previous fixes into a single practical system.
At stoplights, background noise becomes more dominant than your engine.
Typical scenario:
What happens:
Best setup:
In Metro Manila traffic, this condition happens repeatedly. Your setup must handle frequent noise spikes.
Your setup behaves differently depending on speed.
Adjustment strategy:
A single setup should balance both, not optimize for only one.
Rain introduces both physical and audio challenges.
Observed issues:
In light rain, audio may still be usable with proper protection; however, in heavy rain, clarity drops significantly.
Many riders choose to:
Here is a simple setup that works for most riders:
| Setup Element | Recommended Approach |
|---|---|
| Mic type | Lavalier + wireless system |
| Placement | 2–4 cm from mouth, off-center |
| Wind protection | Foam + wind muff |
| Gain | Manual, slightly conservative |
| Mount stability | Secured cables and transmitter |
Scenario A:
Scenario B:
Because compact wireless systems use smaller transmitters and simpler controls, setup becomes easier and more consistent for everyday riding. You can explore the DJI Mic Mini product review to see the latest pricing and options, and how a real system performs in everyday riding conditions, and how it fits into this setup.
For a complete system-level understanding, revisit the motorcycle wireless microphone guide for Filipino vloggers.
A repeatable setup beats a perfect setup. As a result, riders who build a routine before every ride produce more consistent audio than those who constantly adjust on the road.
Adjust mic placement closer to your mouth and avoid padding blockage.
Wind noise happens when airflow hits the mic directly.
Place it near the chin or cheek, about 2–4 cm from your mouth.
Manual gain gives more stable audio in changing conditions.
Auto gain and changing noise levels cause unstable audio.
Yes, proper setup often improves audio more than new gear.
Secure the mic and cables to prevent contact with the padding.
Yes, higher speed increases wind noise significantly.
Wireless setups are more flexible and easier to manage.
Light rain may work, but heavy rain reduces audio clarity.
To fix motorcycle helmet audio, focus on three things: proper mic placement, controlled gain, and effective wind management. These factors matter more than the brand or price of your gear because they directly control how your voice is captured in real riding conditions.
By now, the pattern is clear:
In Philippine riding conditions, your setup is constantly tested. Traffic noise, heat, sudden speed changes, and unpredictable weather all affect your recording. A setup that works only in ideal conditions will fail on real roads.
If your audio still sounds muffled or unstable, revisit the motorcycle wireless microphone guide for Filipino vloggers to understand how each part of your system works together. Fixing audio becomes easier when you see the full picture.
Once your setup is dialed in, the next step is refining your gear based on actual use. You can explore the real-world DJI Mic Mini experience for motorcycle vlogging to see how adjustments perform across different riding scenarios.
If you are considering upgrading or comparing options, check the DJI Mic Mini product review with the latest pricing and options to evaluate performance, reliability, and value in real-world use.
Fixing audio is not about chasing better gear. It is about controlling your environment and building a repeatable setup. Because of this, riders who understand the setup produce clearer and more consistent motovlog audio, regardless of the equipment they use.
Featured image: Editorial composite image created for RobiMotoPH using official product photo.


